Getting started
Output log files during training phase, and ChainerUI collects them. When send training logs via web API, see web API section.
Create a project
$ chainerui project create -d PROJECT_DIR [-n PROJECT_NAME]
The ChainerUI server watches the files below the project directory recursively.
log: Used for chart.args: (optional) Used for result table, show as experimental conditions.commands: (optional) Created by CommandsExtension internally, used for operating training job.
For more detail of the files and how to setup training loop, see Customize training loop
For example, look at the file and directory structure below. When create a project with -d path/to/result, the results of the two directories, result1 and result2 are registered under the PROJECT_DIR (or PROJECT_NAME) automatically, then ChainerUI continuously gathers the both logs.:
path/to/result/result1
  |--- log       # show values on chart
  |--- args      # show parameters on result table as experimental conditions
  |--- commands  # created by CommandsExtension to operate the training loop
  |--- ...
path/to/result/result2
  |--- log
  |--- args
  |--- commands
  |--- ...
Start ChainerUI server
$ chainerui server
Open http://localhost:5000/ . To stop, press Ctrl+C on the console. When use original host or port, see command option:
Customize training loop
ChainerUI basically supports the Trainer module included in Chainer, and some functions without Trainer.
Note
examples/log-file/train_mnist.py, based on chainer/examples/mnist/train_mnist.py, is a useful example to see how to set training loops with ChainerUI.
Note
examples/log-file/train_mnist_custom_loop.py is an example, basaed on chainer/examples/mnist/train_mnist_custom_loop, which does not use the training loop from Trainer. However, this example will not use the training loop from Operate training loop.
Training log
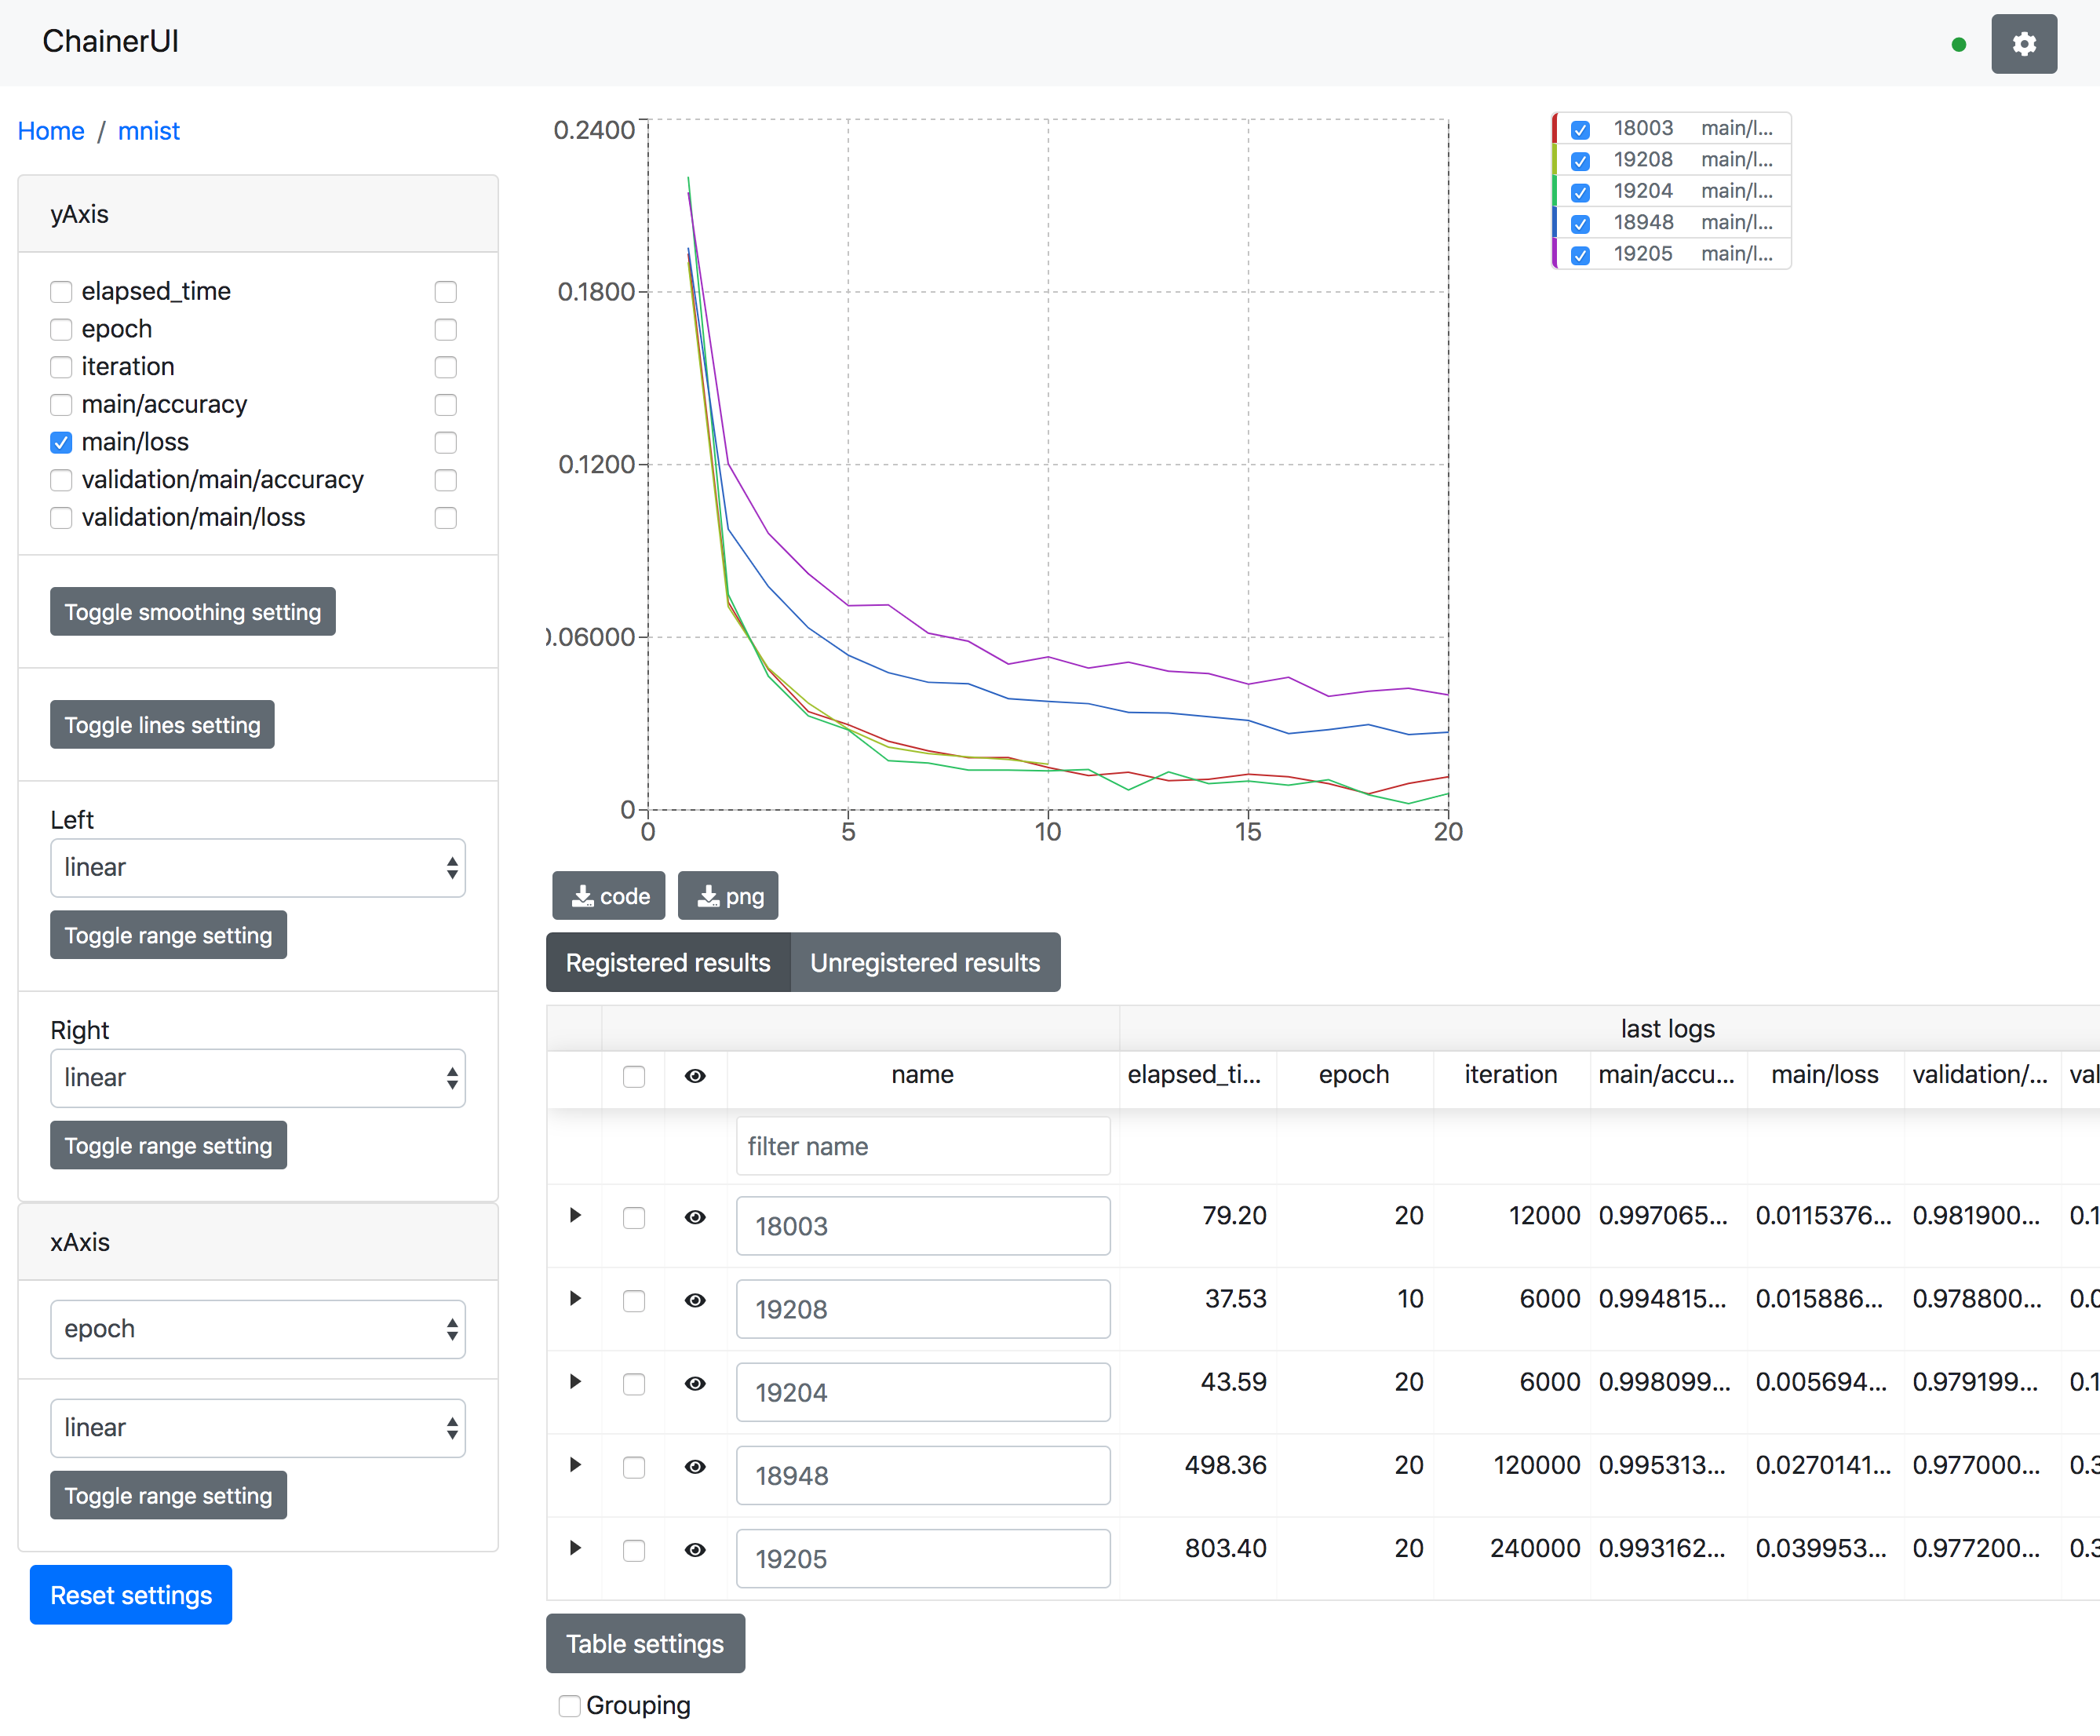
ChainerUI plots training log values read from the log files and shows the training job. The log file is a JSON file created by LogReport extension or chainerui’s LogReport, which is registered automatically and created under the project path. If log files are updated, the chart and results table are also updated continuously.
Note
epoch, iteration, episode, step and elapsed_time are assumed as x-axis. X-axis of a chart is selected by xAxis pane.
- LogReport extension sets
epoch,iterationandelapsed_timeautomatically. - chainerui’s LogReport sets
elapsed_timeautomatically. Other x-axis keys have to be set manually if necessary.
Note
When retrying a training job with a same directory, log file will be truncated and created, then the job overwrites logs the file. But ChainerUI cannot distinguish whether the log file is updated or recreated. ChainerUI recommends to create another directory for output result on retrying.
Setup example from a brief MNIST example:
import chainer.links as L
from chainer import training
from chainer.training import extensions

def main():
    # Classifier reports softmax cross entropy loss and accuracy at every
    # iteration
    # [ChainerUI] plot loss and accuracy reported by this link
    model = L.Classifier(MLP(args.unit, 10))

    trainer = training.Trainer(updater, (args.epoch, 'epoch'), out=args.out)

    # [ChainerUI] read 'log' file for plotting values
    trainer.extend(extensions.LogReport())
Created log file example:
[
    {
        "main/loss": 0.1933198869228363,
        "validation/main/loss": 0.09147150814533234,
        "iteration": 600,
        "elapsed_time": 16.052587032318115,
        "epoch": 1,
        "main/accuracy": 0.9421835541725159,
        "validation/main/accuracy": 0.9703000783920288
    },
    {
        "main/loss": 0.07222291827201843,
        "validation/main/loss": 0.08141259849071503,
        "iteration": 1200,
        "elapsed_time": 19.54666304588318,
        "epoch": 2,
        "main/accuracy": 0.9771820902824402,
        "validation/main/accuracy": 0.975399911403656
    },
    ...
]
A example without Trainer code, from a short extract of the MNIST custom loop example:
from chainerui.utils import LogReport

def main():

    # [ChainerUI] setup log reporter to show on ChainerUI along with 'args'
    ui_report = LogReport(args.out, conditions=args)
    while train_iter.epoch < args.epoch:

        # ...train calculation

        if train_iter.is_new_epoch:

            # [ChainerUI] write values to 'log' file
            stats = {
                'epoch': train_iter.epoch,
                'iteration': train_iter.epoch * args.batchsize,
                'train/loss': train_loss, 'train/accuracy': train_accuracy,
                'test/loss': test_loss, 'test/accuracy': test_accuracy
                }
            ui_report(stats)
Experimental conditions
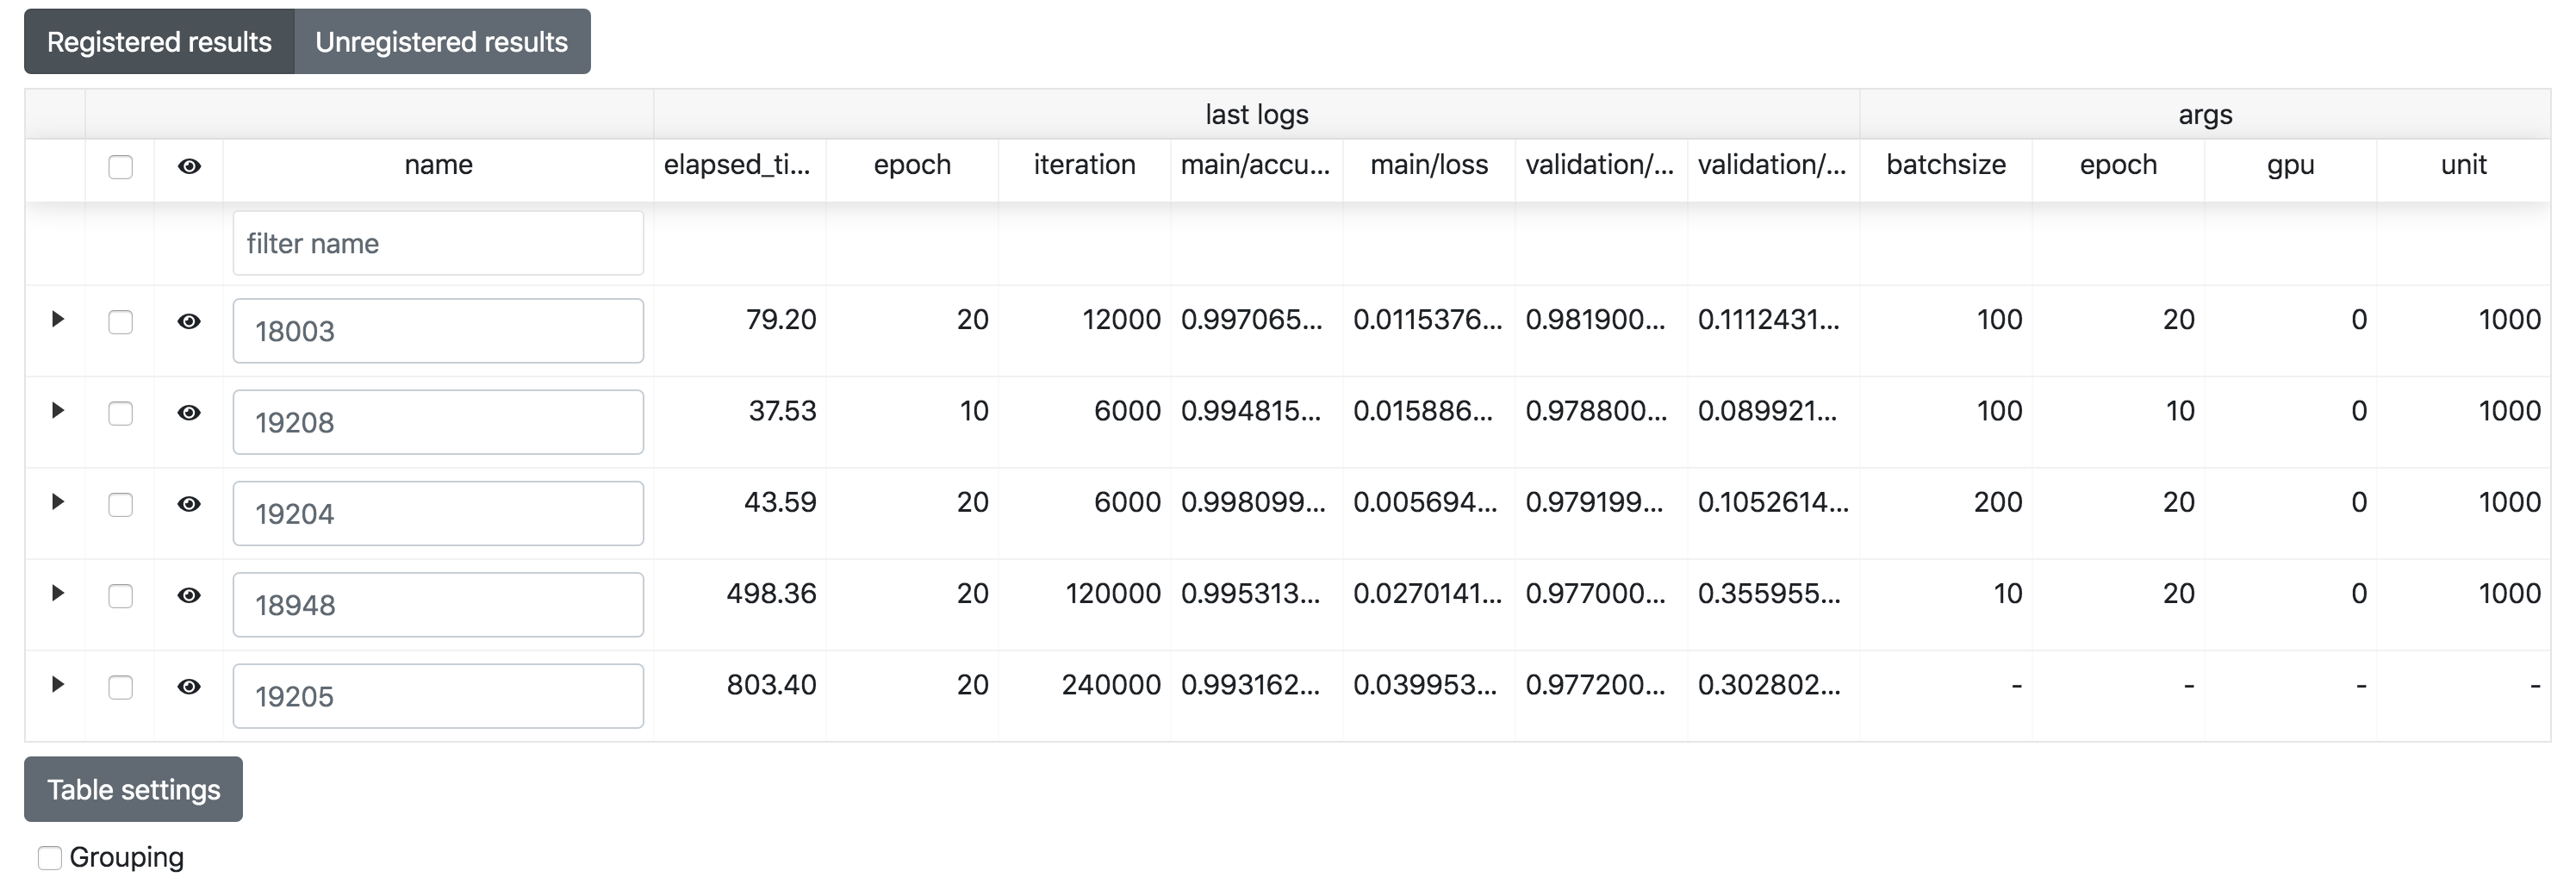
ChainerUI shows the training job with experimental conditions read from the args file. args file is a JSON file, which includes key-value pairs. See save_args, util function to dump command line arguments or dictionaries to args file.
Setup example of a brief MNIST example:
# [ChainerUI] import chainerui util function
from chainerui.utils import save_args

def main():
    parser.add_argument('--out', '-o', default='result',
                        help='Directory to output the result')
    args = parser.parse_args()

    # [ChainerUI] save 'args' to show experimental conditions
    save_args(args, args.out)
Here is an args file examples, with values shown as experimental conditions on a results table:
{
    "resume": "",
    "batchsize": 100,
    "epoch": 20,
    "frequency": -1,
    "gpu": 0,
    "unit": 1000,
    "out": "results"
}
Operate training loop
ChainerUI supports operating a training loop with CommandsExtension. The latest version supports:
- Taking snapshot
- Adjusting the hyperparameters of an optimizer
- Stopping the training loop
Operation buttons are in result table row, click ▼ button to expand, or in result page, click Detail button.
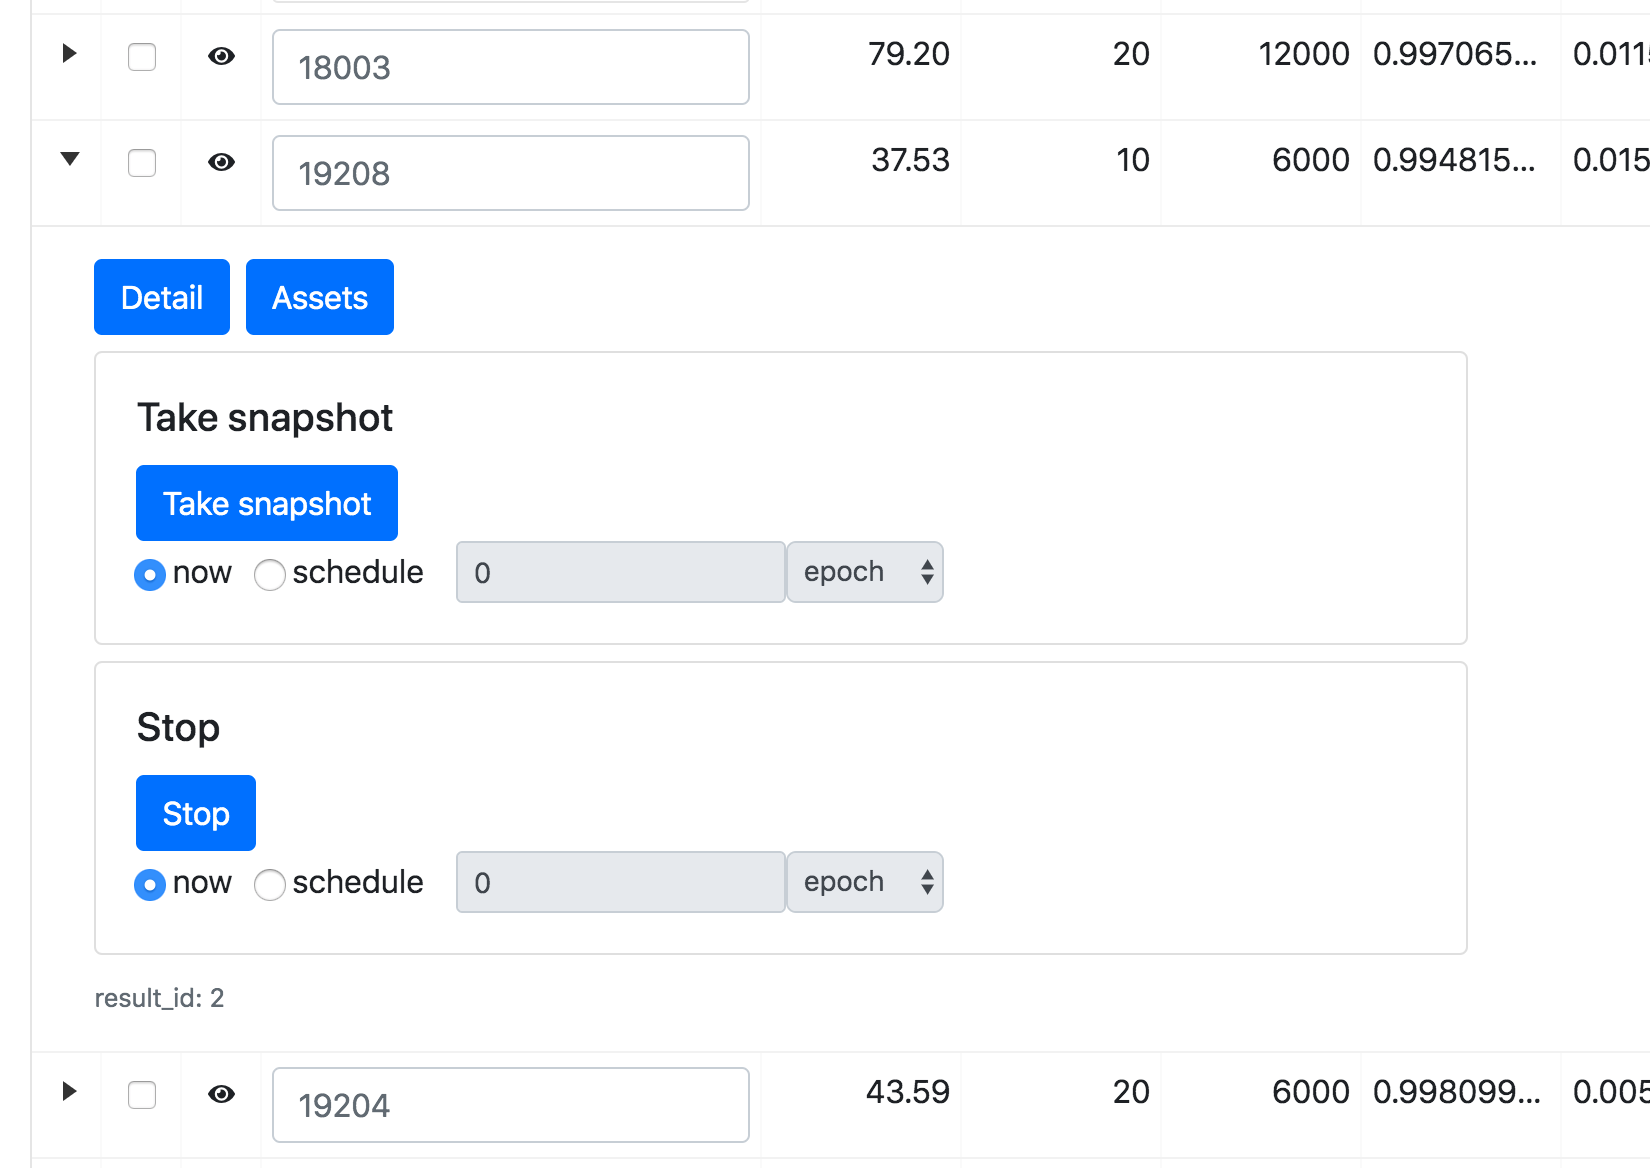
expand table row to show sub components.

commands pane of result page
Setup example of a brief extract MNIST example:
from chainer import training
from chainer.training import extensions

# [ChainerUI] import CommandsExtension
from chainerui.extensions import CommandsExtension

def main():
    trainer = training.Trainer(updater, (args.epoch, 'epoch'), out=args.out)

    # [ChainerUI] Observe learning rate
    trainer.extend(extensions.observe_lr())
    # [ChainerUI] enable to send commands from ChainerUI
    trainer.extend(CommandsExtension())
Note
This operation of a training loop is from the CommandsExtension which requires Trainer. A training loop without Trainer cannot use this function.
Note
Adjusting the hyperparameters supports only MomentumSGD and learning rate (lr). The optimizer is required to be registered by the name 'main'.
Support
updater = training.StandardUpdater(train_iter, optimizer, device=args.gpu)
updater = training.StandardUpdater(train_iter, {'main': optimizer}, device=args.gpu)
Not support
updater = training.StandardUpdater(train_iter, {'sub': optimizer}, device=args.gpu)